

Helping Homeowners and Businesses Restore Comfort
At Alorair, our priority is to help home and business owners restore damaged properties to their original condition through the highest levels of service, quality-assured equipment, and more.
We are the first responders when you face emergencies such as flood damage, severe mold growth, severe weather, etc. Our professional equipment has over 10 years tested and will provide a fast and reliable service. Let us solve the problem effectively and prevent further damage.
Water Restoration Combo Packs
Customize Restoration Packages to Meet Your Unique Needs!
We understand that each restoration project is unique, so we offer customized services for optimal results. With our range of dehumidifiers, air movers, and air scrubbers, you can create tailored packages for any commercial restoration at a lower cost!
To customize your packages, Please feel free to contact our support team:
Tel: (888) 990-7469
Email: support@alorair.com


Custom Service

1-888-990-7469 (Monday-Friday: 07:00AM - 4:00PM) PST
support@alorair.com
Restoration Applications
Explore More Restoration Equipment for Different Applications
Read More

Disinfection & Sanitization Restoration
Ultimate Disinfection & Sanitization Solution: Air Mover & Air Scrubber Combo Packs
Read More

Air Solution Restoration
Elevate Indoor Air Quality: 5 Benefits of Using Air Solution Comb Packs
Read More

Mold Prevention Restoration
How to Prevent Mold After Water Damage Clean-Up
Read More

Fire & Smoke Restoration
5 Easy Ways to Remove Smoke Smells After a Fire
Read More

Flood & Water Restoration
DIY Water Damage Cleanup Success: 5 Mistakes to Avoid
Read More


Our Tech & Articles

How to Choose The Right Size Dehumidifier
Once you have identified the sign of high humidity like:
- Dampness and musty odors in the house.
- Mold and mildew growing on items stored in the house.
- Increased mold and strains on the walls and ceiling.
- the air in the house feels heavy and High temperatures, which make it difficult to regulate your body temperature.
- Reoccurring respiratory complications like flu and other allergies.
- Structure destruction of the foundation especially in the basements and crawl space.
Then you need to buy a dehumidifier!
A dehumidifier regulates the levels of humidity in the air in the house. Dehumidifiers pull the moist air from the house. The air is then directed over coolant-filled coils that condense the moisture. The dry air is then directed out of the dehumidifier back into the house. This process is repeated until the overall level of humidity in the house is at ideal levels.
Some dehumidifiers are fitted with air purifiers that clean the air. They remove any mold spores and bacteria that are in the air.
How to choose the right size of a dehumidifier?
When choosing the right dehumidifier, you should consider the following factors?
- Airflow volume of the dehumidifier – you can choose a dehumidifier depending on the amount of air it is able to clean at a period of time.
Dehumidifier measures this in cubic feet per minute (CFM). The recommended CFM is calculated based on the level of humidity in the house and the square footage of the house.
Air changes per hour (ACH) refer to the number of times the air should cycle through the dehumidifier to decrease the level of humidity in the room.
The recommended ACH levels according to the humidity level are:
- 60 – 70 %( damp air) – This is the normal humidity level in most crawl spaces and basements. The ACH = 3
- 70-80 %( very damp air) – The room has visible moisture drains on the floor and walls. The ACH = 4
- 80 – 90% (Wet air) – Visible wet spots on the walls and floor. The ACH = 5
- 90-100 %( Very wet air) – Puddles of water can be seen clearly on the floor. The ACH = 6
On most dehumidifiers, you find their Air changes per hour (ACH) values clearly indicated.
- The area size to be dehumidified – the capacity of any dehumidifier is the amount of moisture (measured in pints) extracted in a span of 24 hours.
This means that smaller capacity dehumidifiers are only ideal to remove moisture in smaller rooms. It is therefore important to ensure you buy a dehumidifier whose capacity is directly correlated to the square feet of the house.
Here is a simple guide from the association of home appliance manufacturers (AHAM) for the recommended dehumidifier’s capacity to house size.
AHAM dehumidifier sizing guidelines: room size versus current humidity conditions
|
The condition of the basement |
500 Sq. |
1000 Sq. |
1500 Sq. |
2000 Sq. |
2500 Sq. |
|
Moderately damp room with a musty smell. |
10 pints |
14 pints |
18 pints |
22 pints |
26 pints |
|
Very moist room with damp stains on the floor and walls. |
12 pints |
17 pints |
22 pints |
27 pints |
32 pints |
|
Very wet room with clear wet walls and floor. |
14 pints |
20 pints |
26 pints |
32 pints |
38 pints |
|
Extremely wet room with puddles of water on the floor and dripping water on the walls |
16 pints |
23 pints |
30 pints |
37 pints |
44 pints |
- The temperature of the environment the dehumidifier will operate. If the temperatures are low, buy a dehumidifier with de-freezing features. To ensure the dehumidifier is able to keep operating optimally even in temperature as low as 20 degrees.
- In internal pump – This is recommended for buyers looking dehumidify the wet large room, where they expect to collect over 20 pints of water. An internal pump directs the water out to a safe place away from the house.
- Auto-humidistat – Automatically shuts down the dehumidifier when the humidity levels reach the required levels.
- Energy star qualified dehumidifier – This is a dehumidifier that has been proven to consume the least amount of energy needed to operate.
Whole House Dehumidifier Pros and Cons: What to Know
Damp basements, musty closets, and windows that fog on summer mornings all point to the same underlying issue: too much moisture in the air. Portable units help in one room, but they rarely solve humidity that moves through an entire house. A whole-house dehumidifier is a centralized unit, usually connected to ductwork, that removes moisture from the air across multiple rooms rather than a single space. This article looks objectively at the whole-house dehumidifier pros and cons so you can judge them against your own home.
Whole House Dehumidifier Pros and Cons at a Glance
|
Pros |
Cons |
|
Consistent humidity across multiple rooms |
Higher upfront cost |
|
Automatic control and continuous drainage |
May require professional installation |
|
Reduces dampness and moisture-related conditions |
Adds electricity use and heat |
|
Improves comfort and supports AC humidity control |
Requires space and ongoing maintenance |
|
Helps protect the home and belongings |
Depends on correct sizing and system design |
|
Reduces equipment noise and clutter in living areas |
Does not fix the source of moisture |
A home with high humidity in every room faces a different problem than a home with one damp basement corner. How much each row matters comes down to your humidity conditions, HVAC setup, installation requirements, and where the moisture originates.
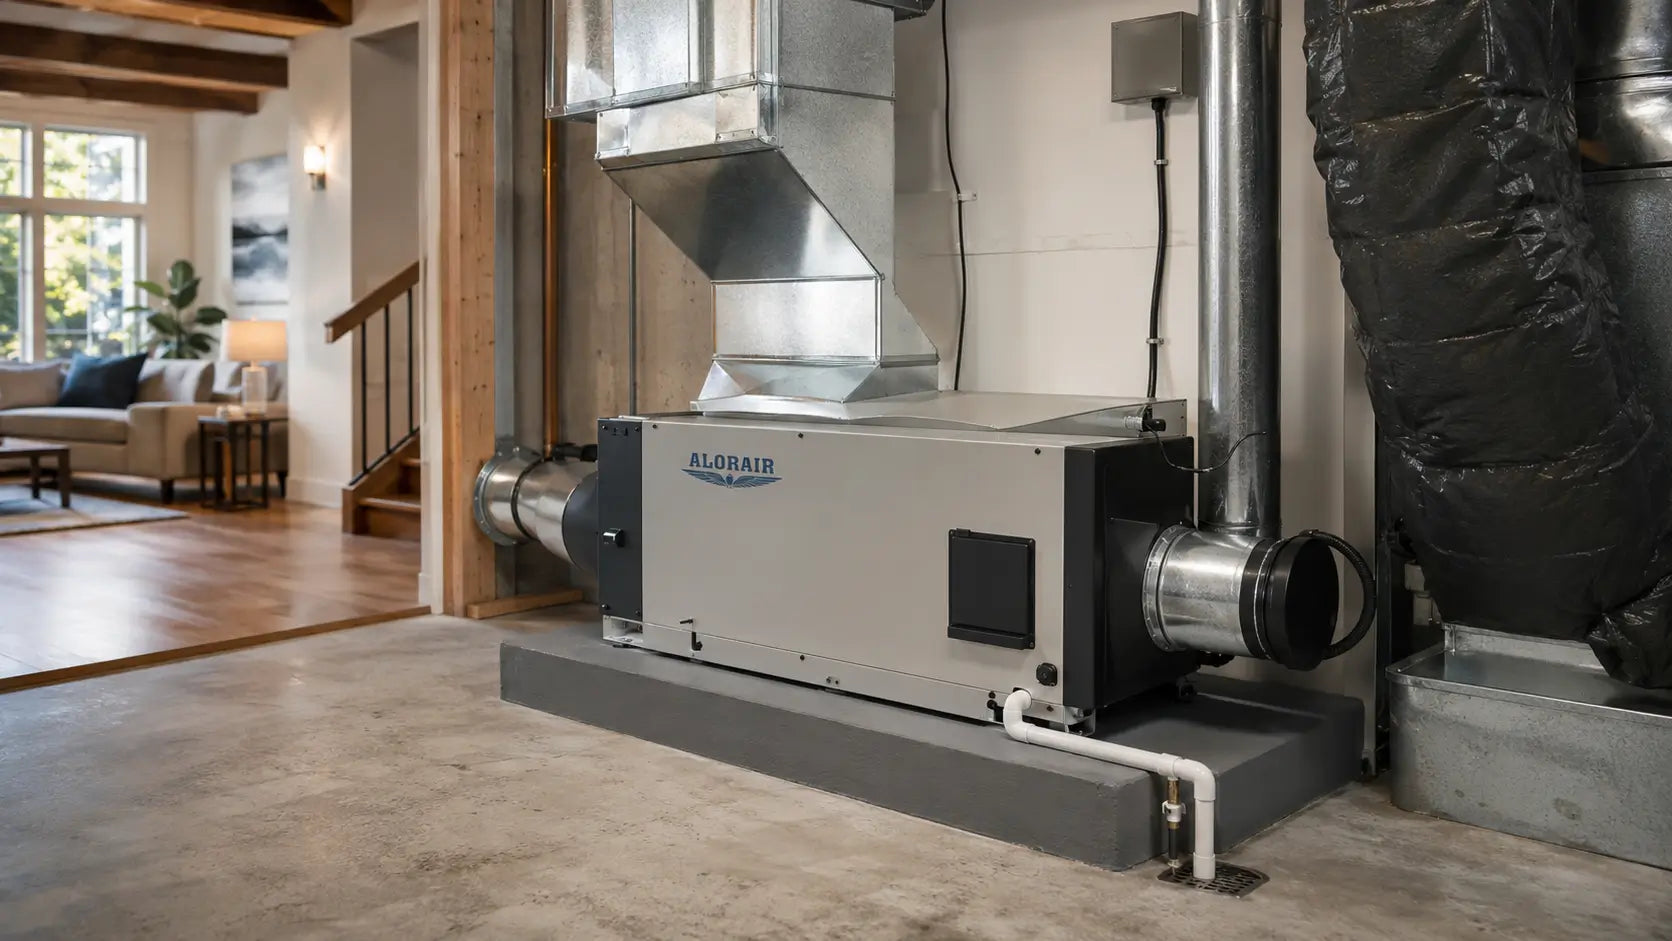
What Is a Whole House Dehumidifier?
A whole house dehumidifier controls relative humidity (RH) across multiple rooms rather than a single space. RH measures water vapor in the air as a percentage of what that air can hold at a given temperature.
Most whole-home units run on refrigerant: they pull air across a cold coil, condense moisture out of it, and send drier air back into the house.
Four features set them apart from portable units:
-
Automatic humidistat control. The humidistat reads RH and cycles the unit to hold your setpoint. You set it once.
-
Continuous drainage. Condensate leaves through a gravity drain line or condensate pump. No bucket to empty.
-
Duct connection. The unit ties into existing HVAC ductwork or its own dedicated run.
-
Multi-room distribution. Drier air travels through the duct system instead of staying put.
The airflow path and control logic get technical fast. If you want the mechanics, our breakdown of how a whole house dehumidifier works covers the coil operation step by step.
Pros of a Whole House Dehumidifier
Consistent, Automatic Humidity Control
A centralized system treats the entire air volume of the house. A portable unit dries the air near itself and leaves the rest alone. A ducted unit draws air from the returns, dries it, and pushes it back out through every supply register.
The humidistat runs the show. You pick a target RH and the unit works toward it. The EPA recommends keeping indoor relative humidity below 60%, ideally between 30% and 50%, to limit mold and dust mites. Most homeowners land somewhere between 45% and 55%.
Continuous drainage keeps it hands-off. Condensate flows to a floor drain or pump, so the unit runs for weeks unattended. Portable units stop when the bucket fills, often overnight, during the exact hours humidity peaks.
Room-to-room results still vary with layout, duct design, and how often the air handler fan runs.
Reduces Dampness and Moisture-Related Conditions
Condensation forms when warm, moist air hits a surface below its dew point. Drying the air lowers that dew point, so fewer surfaces reach it. You see less fogging on windows, less sweating on cold pipes, and fewer damp patches on basement walls.
Musty odors come from microbial growth on damp materials. Mold needs water, which is why the EPA treats moisture control as the core of mold prevention. Dust mites also thrive on atmospheric humidity and decline in drier air, which matters for allergy and asthma households.
One limitation matters more than the rest. A dehumidifier stops growth from continuing. It does not remove mold that already exists, and it does not repair what let the water in.
Improves Comfort and Supports AC Humidity Control
Humid air makes a room feel warmer than the thermostat says, because sweat evaporates slowly when the surrounding air is already near saturation. Drop the RH and that evaporative cooling returns. A house at 74°F and 45% RH often feels better than the same house at 72°F and 65% RH.
Air conditioners dehumidify only while the compressor runs. In mild, humid weather, an AC unit hits the thermostat setpoint and shuts off before removing much moisture. Oversized systems do this faster. A dedicated dehumidifier covers those gaps.
Two limits: a dehumidifier does not cool the house, and it slightly warms the air passing through it. Some homeowners nudge the thermostat up once humidity drops, but lower bills are never guaranteed.
Helps Protect the Home and Belongings
Wood absorbs and releases moisture with the air around it. High indoor RH can cup hardwood flooring, swell door frames, and loosen furniture joints over time. Steady humidity control narrows those swings.
Other items benefit too:
-
Stored textiles. Clothing and linens in closets and basements pick up musty odors and mildew stains.
-
Paper and photographs. Books, documents, and prints cockle or stick together in damp storage.
-
Metal tools. Surface rust accelerates as RH climbs, a familiar complaint in garages and basement workshops.
-
Electronics and instruments. Wooden instruments react to humidity swings especially.
This protection is preventive. It slows future damage but reverses nothing already warped, rusted, or stained.
Reduces Equipment Noise and Clutter in Living Areas
Centralized units sit in basements, crawl spaces, mechanical rooms, or attics. That keeps them out of sight and moves the sound out of occupied rooms. A portable unit does the opposite: it takes up floor space and runs within earshot.
Sound ratings give rough context. The AlorAir Sentinel WHD 120 carries a 62 dBA rating, measured at the unit itself, not at the end of a duct run upstairs.
Installation quality matters more than the number. A unit bolted directly to joists under a bedroom transmits vibration through the structure. Flexible duct connectors and isolation pads solve more noise complaints than a lower dBA rating does.
Cons of a Whole House Dehumidifier
Higher Upfront Cost and Installation Requirements
A whole-home dehumidifier costs substantially more than a portable unit, and the equipment price is only part of the total. Residential whole-house dehumidifiers commonly run from roughly $1,400 to $3,800 for the unit alone, depending on capacity and features. Installation is a separate line item.
A typical project may involve:
-
Ductwork. New supply and return connections, or a dedicated run.
-
Drainage. A gravity line to a discharge point, or a condensate pump.
-
Electrical. Often a dedicated circuit. Most residential units run on 115V.
-
Controls. Humidistat wiring and air handler integration.
-
Labor and permits. Requirements vary by jurisdiction.
Homeowners most often underestimate the HVAC integration. Tying a dehumidifier into existing ducts changes airflow, and a contractor has to confirm the system handles it without starving the air handler.
That step is not DIY. Regional labor rates and duct condition turn the total considerably; our whole house dehumidifier cost breakdown separates equipment from installation line by line.
Additional Electricity Use and Heat
The unit adds a load that did not exist before, and it runs during humid stretches of spring and fall when the AC sits idle. The Sentinel WHD 120 draws 115V/6.8 amps, roughly a small window AC. Run hours matter more than amperage.
These units also add heat. Condensing water vapor releases latent heat, and the compressor adds its own, so air leaves warmer than it entered. In a crawl space nobody notices. In a living area during August, your AC picks up the difference.
Reduced humidity can help an AC run more efficiently. It can also cost more overall once the dehumidifier's own draw counts. Climate, equipment, and utility rates decide which.
Requires Space and Ongoing Maintenance
The WHD 120 measures 22.6" × 14.7" × 19.9" and weighs 89 pounds, and that footprint excludes service clearance. Placement has to allow both operation and access.
Plan for:
-
Equipment clearance on the service side and around inlets and outlets.
-
Duct routing without sharp bends that choke airflow.
-
Drainage access to a floor drain, sump, or exterior point with proper slope.
Maintenance stays light but never optional:
-
Filter replacement. The WHD 120 uses a MERV-10 filter. A loaded filter cuts airflow and moisture removal.
-
Coil cleaning. Dust on the evaporator coil reduces capacity.
-
Drain and pump service. Lines clog with biological growth. Float switches fail. A dead pump in an unmonitored crawl space goes unnoticed until water shows up.
A crawl space install with 18 inches of headroom works fine and makes filter changes miserable. Settle placement before purchase, our whole house dehumidifier installation guide walks through clearance and location tradeoffs.
Incorrect Sizing or System Design Can Reduce Performance
Undersized units cause the most complaints. Below the home's moisture load, the unit runs constantly and never reaches setpoint. Owners blame the equipment when the spec was wrong.
Rating standards add confusion. The WHD 120 delivers 104 PPD (pints per day) under AHAM conditions at 80°F and 60% RH, and 85 PPD under DOE Whole House conditions at 73°F and 60% RH. The DOE figure reflects cooler, more realistic homes. Comparing an AHAM number against a DOE number overstates capacity.
Ductwork decides where the dry air actually goes. Undersized ducts, crushed flex, or unbalanced branches leave one wing humid while another sits fine. The WHD 120's 229/309 CFM (cubic feet per minute) rating holds only if the ducts support it.
Sensor placement shapes behavior. A humidistat near a bathroom or supply register reads local air, not the house, and cycles the unit at the wrong times.
Oversizing gets overstated. A significantly oversized unit may cycle more than necessary, but that depends on control strategy and humidistat differential. Modest oversizing for peak humid weather is often sensible.
Does Not Fix the Source of Moisture
A dehumidifier treats airborne moisture. It does not touch the source.
It cannot substitute for:
-
Plumbing or roof leak repairs. Active intrusion outpaces any dehumidifier and damages materials directly.
-
Foundation drainage. Bad grading, failed gutters, and short downspouts drive water at the foundation.
-
Air sealing. Open rim joists and leaky ducts pull humid outside air inside.
-
Crawl space vapor barriers. Bare soil releases moisture continuously. A barrier is a prerequisite.
-
Bath and kitchen exhaust. Fans venting into an attic relocate moisture instead of removing it.
-
Mold remediation. Existing growth needs cleaning regardless of your RH setpoint.
Fix the source first. A dehumidifier running over an active leak hides the symptom while damage spreads behind the wall.
May Be Excessive for a Localized Moisture Problem
One damp basement corner, a laundry room with weak exhaust, or a three-week seasonal spike rarely justifies a centralized system. A standalone or portable unit, better ventilation, or a targeted repair often handles it for far less. Measure RH in several rooms on different floors first, then decide.
Choosing the Right System: Size and Type
How Capacity and Square Footage Affect Performance
Match capacity to square footage and moisture load. Two 3,000 sq ft homes differ enormously: one sits on a slab in Arizona, the other over a wet crawl space in Georgia.
Moisture load comes from crawl space and basement conditions, soil moisture, occupancy, air leakage, ventilation, laundry, and outdoor dew point. A vented crawl space over bare soil carries a far heavier load than a sealed one.
Miss in either direction and you pay for it. Undersized units run constantly and miss setpoint. Substantially oversized units cost more than needed. Neither reflects equipment quality.
The whole-home lineup in our collection of whole house dehumidifiers maps to coverage areas as follows:
|
Model |
AHAM Rating |
Coverage Area |
|
90 PPD |
Up to 2,300 sq ft |
|
|
104 PPD |
Up to 3,000 sq ft |
|
|
140 PPD |
Up to 3,500 sq ft |
|
|
165 PPD |
Up to 4,500 sq ft |
Coverage figures assume typical conditions. High-load homes may need the next size up, and a contractor's load calculation beats any square footage chart.
Ducted vs. Standalone Whole-House Units
A ducted, HVAC-integrated install ties into existing supply and return ducts and treats the whole house from one spot. A standalone whole-home unit serves a defined zone, usually a basement, crawl space, or attic, free-standing or with its own short run.
The AlorAir Sentinel WHD line handles both. Adjustable inlet and outlet configurations (forward/rear air or forward/up air) let the same unit duct into a central system or condition a single zone.
Every model includes SLGR (Super Low Grain Refrigerant) technology for stronger moisture removal at lower humidity levels, automatic defrost for cool spaces, gravity drainage, and cETL listing, backed by a 6-year limited warranty with full coverage for the first two years.
Let the humidity pattern decide. House-wide high RH points to integration. A dry main floor over a wet crawl space points to a dedicated zone unit.
Conclusion
Whole-home units win on scope: one system, every room, automatic operation, no buckets. They cost more upfront, need professional installation, add electricity use, and demand correct sizing to deliver. And none of them fixes a leak. Measure RH on several floors before you commit. If the numbers stay above 60% across the house, a centralized unit earns its place. If one room drives the whole problem, solve that room.
Larger footprint or heavier moisture load? Compare the full whole house dehumidifier lineup from 90 to 165 PPD, or contact our team and we'll help you match capacity to your home.
FAQs - Whole House Dehumidifier Pros and Cons
Is a whole-house dehumidifier worth it?
It depends on scope. If RH stays above 60% across multiple rooms and you've ruled out leaks or drainage problems, a centralized unit is usually worth it. If one damp room drives the issue, a smaller unit or a targeted repair costs far less.
How long do whole-house dehumidifiers last?
Most run 8 to 15 years. Maintenance matters more than brand; filter changes, annual coil cleaning, and a working condensate pump keep the compressor from overworking. AlorAir Sentinel WHD models carry a 6-year limited warranty.
What RH should I set a whole house dehumidifier to?
Most homeowners target 45–55%. The EPA recommends keeping indoor relative humidity below 60%, and ideally between 30% and 50%. Very low setpoints increase run time and energy use without much additional benefit in most homes.
How often does it need maintenance?
Filter checks every one to three months during heavy use, with replacement as needed. Coil inspection, drain line clearing, and condensate pump checks at least annually. Frequency depends on dust levels and run hours.
Industrial Dehumidifiers: How They Work, Benefits, Costs, and Selection
Humid air rusts your inventory, warps your stock, and stalls your drying schedule. This industrial dehumidifier guide covers the two technologies, what the capacity ratings actually mean, and what the equipment costs to own. The goal is the right humidity for your application, not the lowest number the machine can hit.
What Is an Industrial Dehumidifier?
An industrial dehumidifier handles high or continuous moisture loads in large, demanding spaces. Size alone doesn't define it. Capacity, duty cycle, build quality and control range do.
Five things set this equipment apart:
-
Continuous operation. These units run for weeks or months without stopping. Compressors, fans and bearings are rated for duty cycles that would kill a residential appliance in a season.
-
High removal capacity. Ratings run in pints per day (PPD) or liters per day. Portable industrial units start around 70 PPD and climb into the several-hundred range. Fixed systems go higher.
-
Process-level humidity control. Some jobs need a specific relative humidity (RH) band. Others need a target dew point, the temperature where air saturates, and water starts condensing. Dew point matters more in cold and process work, because RH alone won't tell you how much water the air holds.
-
Serviceable construction. Roll cages, coated coils, accessible filter panels, stocked parts. Equipment that runs nonstop will need parts eventually.
-
Portable, fixed and ducted options. A restoration crew needs units that fit through doorways. A pharmaceutical dry room needs a ducted system with external static pressure capability.
Industrial vs. Commercial vs. Residential Dehumidifiers
The commercial vs. industrial dehumidifier line moves depending on who's selling. One supplier calls a 200 PPD portable unit commercial. Another calls it industrial. Read the specs, not the label.
|
Factor |
Residential |
Commercial |
Industrial |
|
Applications |
Basements, crawl spaces, single rooms |
Offices, retail, hotels, gyms, pools |
Warehouses, manufacturing, food processing, cold storage, restoration |
|
Capacity |
20–70 PPD |
70–200 PPD |
100 PPD to several hundred; engineered systems higher |
|
Airflow |
Under 200 CFM (cubic feet per minute) |
Several hundred CFM |
300–1,000+ CFM, with static pressure capability on ducted units |
|
Duty cycle |
Seasonal, intermittent |
Extended daily |
Continuous, often 24/7 for months |
|
Installation |
Plug-in |
Portable or wall-mounted |
Portable, fixed, ducted, HVAC-integrated |
|
Controls |
Basic humidistat |
Digital humidistat, timers |
Dew point control, BMS integration, remote monitoring |
|
Power |
115V |
115V or 230V |
115V, 230V or three-phase |
|
Service |
Sealed appliance |
Some serviceable parts |
Field-serviceable, stocked parts |
The real test: does the unit's capacity at your temperature and humidity match what your building demands?
Common Industrial Dehumidifier Applications
Industrial dehumidifier applications cover a wide range of conditions. Each one has a different reason for controlling moisture, which is why no single RH setpoint works everywhere.
-
Warehouses. Big air volumes, constant door traffic, outdoor air pushing in. You're protecting cardboard, labels and metal goods.
-
Manufacturing. Coating, printing, adhesive curing and powder handling all shift with ambient moisture. Batch-to-batch variation often traces straight back to humidity nobody logged.
-
Food processing. Ceiling condensation is a sanitation problem before it's anything else. Humidity also drives powder flow and packaging integrity.
-
Construction drying. Fresh concrete, screed, plaster, and drywall dump water into the air. Pull it out or drying stalls.
-
Water-damage restoration. Hit drying goals before secondary damage sets in. This is where low-grain refrigerant (LGR) equipment earns its keep.
-
Cold storage. Below roughly 50°F, refrigerant coils frost and lose efficiency. Cold rooms and freezer anterooms usually need desiccant.
-
Pharmaceutical and dry rooms. Battery manufacturing and lyophilization suites may need dew points below freezing. These are engineered systems, not catalog buys.
How Do Industrial Dehumidifiers Work?
Industrial dehumidifiers pull water out of air one of two ways: refrigerant condensation or desiccant adsorption. Different physics, different temperature ranges, different results.
Knowing how do industrial dehumidifiers work at this level lets you match equipment to conditions instead of chasing a headline number.
A unit that pulls 200 PPD in a warm, saturated warehouse might manage a fraction of that in a 45°F cold room. Nothing's broken, the physics just stopped cooperating.
Refrigerant Dehumidification
Refrigerant units chill air below its dew point, condense the moisture out, then reheat the air before discharge. Four stages:
-
Intake and filtration. A fan pulls humid air through a filter that catches dust before it fouls the coil.
-
Cooling below dew point. Air crosses a cold evaporator coil. Drop it past the dew point and water vapor condenses on the coil surface.
-
Condensate removal. Water collects in a pan and exits through a gravity drain or a built-in pump.
-
Reheat and discharge. Drier air passes over the warm condenser coil and leaves the unit. The compressor's work energy has to go somewhere, so refrigerant units add heat to a space.
Plan around that heat. In a sealed room, a large unit will noticeably warm the space over a shift. Restoration crews often want that; warm air holds more moisture and speeds evaporation. In a temperature-sensitive production area, it's a problem.
Desiccant Dehumidification
Desiccant units remove vapor by adsorption; water molecules stick to the surface of a desiccant material. (Adsorption, with a d, is surface adhesion. Absorption is bulk uptake. Not interchangeable.)
A rotating wheel does the work:
-
Process air crosses the rotor. Humid air flows through one section of a slowly turning wheel, usually silica gel or a molecular sieve. Vapor adsorbs to the surface. Dry air discharges back into the space.
-
The rotor turns for reactivation. The loaded section rotates into a separate, sealed airstream.
-
Heated air strips the moisture. Hot air, electric, gas, or steam, drives the adsorbed water back into vapor.
-
Wet exhaust vents outside. Duct it out of the controlled space. Discharge it indoors, and you've just moved moisture around. This is the most common desiccant installation mistake.
The rotor returns to the process side and starts over. The cycle never stops.
Adsorption doesn't need air cooled below dew point, so desiccant works where refrigerant fails:
-
Cold environments, cold storage, freezer anterooms, refrigerated docks
-
Low dew points, below roughly 40°F dew point, out of practical refrigerant range
-
Dry rooms, battery manufacturing, lithium handling
-
Pharmaceutical manufacturing, tablet coating, powder handling, packaging with documented specs
The compromise is energy. Reactivation heat is a continuous load, and desiccant systems generally burn more energy per pint removed than refrigerant equipment running in its comfort zone.
Refrigerant vs. Desiccant Dehumidifiers
The refrigerant vs. desiccant dehumidifier call comes down to three questions. How cold is the space? How dry does it need to be? Temporary or permanent?
|
Selection factor |
Refrigerant |
Desiccant |
|
Operating temperature |
Best above roughly 65°F; declines as temperature falls; needs defrost below roughly 50°F |
Works across a wide range including sub-freezing |
|
Practical humidity target |
Moderate targets, roughly 40–45% RH in typical conditions; LGR/SLGR goes lower |
Low RH and low dew point, below 0°F dew point in engineered systems |
|
Energy |
Lower per pint within its range |
Higher, from continuous reactivation heat |
|
Installation |
Power and a drain for portables; airflow design for ducted |
Needs reactivation intake and exhaust ducting outside |
|
Condensate |
Produces liquid; needs drain or pump |
None in the controlled space |
|
Applications |
Restoration, structural drying, warehouses, crawl spaces, workshops |
Cold storage, dry rooms, pharmaceutical, low-dew-point process areas |
Short version: warm space with moderate targets, buy refrigerant. Cold space or genuinely low dew point, desiccant isn't a preference; it's the requirement.
Benefits of Industrial Dehumidifiers
The industrial dehumidifier benefits that show up on a budget are the losses that stop happening. Corroded tooling, buckled pallets, failed QC batches, drying jobs running three days past quote. Controlled humidity cuts the conditions behind them, though results depend on your load and operating conditions.
Protecting Equipment, Materials and Inventory
Holding RH in a defined band may reduce:
-
Corrosion. Atmospheric corrosion of steel accelerates above roughly 60% RH, faster where salt or contaminants sit on the surface. Bare stock, tooling and dies take the hit first.
-
Swelling and warping. Wood, paper, cardboard and textiles are hygroscopic. They take on water and change dimension.
-
Packaging failure. Corrugated cardboard loses compressive strength as it absorbs moisture. That's why stacked pallets buckle in humid warehouses.
-
Powder clumping. Sugar, salt, milk powder and pharmaceutical excipients cake and bridge in hoppers when humidity climbs.
-
Inventory write-offs. Product downgraded, returned or scrapped.
Reducing Condensation and Mold-Supporting Conditions
Condensation forms when air hits a surface colder than its dew point. Drop the air's moisture content and the dew point drops with it, so surfaces have to get much colder before water forms. That's the mechanism behind sweating pipes and dripping ceilings.
Mold needs moisture. The EPA points to moisture control as the core strategy for preventing indoor mold and recommends keeping indoor humidity below 60% RH, with 30–50% preferred in occupied spaces.
Three limits, stated plainly:
-
A dehumidifier doesn't remove existing mold. Established growth needs physical remediation.
-
It doesn't repair leaks. Running equipment against an active water source treats the symptom while the cause keeps going.
-
It doesn't replace building repairs. Failed vapor barriers and envelope defects need fixing. Equipment can mask them and delay the actual repair.
Supporting Product Quality and Process Stability
Adhesive cure rates, coating flow, print registration, and powder compaction all shift with ambient RH. Stable air means less variation between batches.
When humidity swings 25 points between a dry morning and a humid afternoon, settings dialed in under one condition drift under the other. Operators compensate. Output varies. Nobody spots the cause because nobody logged the RH.
No universal target exists. Establish the requirement first, then size equipment to hold it. Over-drying is a real failure mode: paper turns brittle and static-prone, wood cracks, and specified materials go out of spec in the dry direction just as easily.
Accelerating Construction and Structural Drying
Drying is evaporation, and evaporation stops when the surrounding air saturates. Wet materials release moisture into the air. Unless that moisture leaves, everything reaches equilibrium and drying stalls.
This covers water-damage restoration, construction drying on fresh concrete and drywall, leak recovery, and renovation work under compressed schedules.
Dehumidification works with air movement, not instead of it. Air movers break the saturated boundary layer sitting against wet surfaces, speeding evaporation.
The dehumidifier then pulls that moisture out of the air. Run one without the other and results suffer; air movers alone just relocate moisture, and a dehumidifier alone leaves surfaces drying under a film of saturated air.
Reducing Maintenance, Waste and Downtime
Effective industrial humidity control may cut recurring costs, though the size of the effect varies by facility:
-
Less corrosion on bearings, contacts and control panels
-
Fewer inventory write-offs and returns
-
Fewer stoppages from clogged hoppers and jammed feeders
-
Less scrap and rework from moisture-related quality failures
-
Slower deterioration of building materials and finishes
These are reductions in probability, not guarantees. A facility with an unaddressed water intrusion won't fix it with equipment.
How to Choose an Industrial Dehumidifier
Selection runs in sequence: application, then technology, then capacity, then installation. Most buyers skip to capacity. That's how facilities end up with equipment that sizes correctly on paper and underperforms in the building.
Define the Application and Humidity-Control Goal
Document six things before you compare anything:
-
Temporary or permanent. A three-week restoration job and a permanent warehouse install lead to completely different equipment.
-
Current and target RH or dew point. Measure across a full operating cycle, not once. Set the target from the actual requirement, regulation, customer spec, material tolerance, or condensation control.
-
Operating temperature. The most important input for technology selection. Below roughly 50°F, refrigerant needs defrost or gives way to desiccant.
-
Primary moisture source. Door infiltration, process water, wet materials, occupancy, slab moisture. Infiltration swings with weather. Process loads stay steady.
-
Required drying time. A deadline-driven drying job needs surplus capacity. A steady-state load doesn't.
-
Portable, fixed or integrated. This drives power, ducting, controls, and service access.
Load calculation is its own exercise, and it's the step that decides if the rest of your specs mean anything. Our industrial dehumidifier sizing guide walks through the inputs and the math.
Select the Technology and Configuration
Temperature and target set the technology. How you use the space sets the configuration.
-
Portable standalone. Temporary deployment, restoration, construction drying, moving loads. Plug in, drain, run. Limited by cord reach, drain access, and the fact that they treat the air near them.
-
Fixed standalone. Wall- or ceiling-mounted, serving a defined space with a steady load. Crawl spaces, storage rooms, pool halls, equipment rooms.
-
Ducted. Unit sits in a mechanical space and distributes dry air through ductwork. Needed where the equipment can't occupy the conditioned space or serves several areas. Match external static pressure to the duct design.
-
Zoned or whole-facility. Multiple units or a central system under zone control, usually tied into the building management system.
Once you've narrowed the configuration, the specification details start to matter: voltage, drainage, controls, service access. Our commercial and industrial dehumidifier buying guide lays those decisions out in order.
Compare Capacity and Performance Specifications
Capacity ratings are the most misread number in this category. A 250 PPD unit won't pull 250 pints a day in your building unless your building matches the test conditions.
Always check the conditions behind the rating. Many portables are rated at saturation, often around 80°F and 60% RH, sometimes 90°F and 90% RH. Higher test conditions produce bigger headline numbers from identical hardware.
Good manufacturers publish performance curves across multiple temperature and RH points; if a supplier can't produce one, that tells you something. Airflow in CFM matters just as much, since low airflow leaves dead zones regardless of removal capacity.
Also confirm the operating range and defrost method, the power supply (larger units often need 230V or three-phase, so verify available service before delivery), and external static pressure capability for ducted work.
Plan for Installation, Drainage and Service
Nominal capacity can't fix bad air distribution. A correctly sized unit stuck behind racking, blowing into a wall, treats a fraction of the space you bought it for. Racking, stacked inventory, and partitions all break up airflow, so verify conditions across the space with a hygrometer after commissioning.
Remember that one unit in a corridor won't condition four closed rooms, open the space, duct each zone, or add units.
Gravity drainage is simplest and has no pump to fail, but it needs a drain below the outlet and a continuous slope. Where that isn't available, a condensate pump lifts water to a higher drain; check the rated lift height and remember horizontal run eats into it.
Plan service access before you set the unit. For equipment running years at a time, also confirm that filters, pumps, fans and control boards are stocked as individual parts, and that warranty terms and technical support are documented before you buy.
How Much Does an Industrial Dehumidifier Cost?
Industrial dehumidifier cost spans plug-in portables and permanently installed engineered systems. Technology, capacity, configuration, electrical requirements, and installation complexity all move the number. Published ranges across a category this wide aren't reliable, so break the cost into three parts.
Equipment and Installation
Portable refrigerant units carry a purchase price and almost nothing else. Plug in, connect a hose or use the onboard pump, run.
Permanent systems add line items:
-
Electrical, dedicated circuits, 230V or three-phase, disconnects
-
Ductwork, supply and return, plus reactivation intake and exhaust for desiccant
-
Drainage, condensate lines, pumps, building tie-in
-
Mounting, hangers, curbs, structural support, vibration isolation
-
Controls, humidistats, dew point sensors, BMS integration
-
Commissioning, airflow balancing, control verification, performance testing
Installation often runs a meaningful fraction of equipment cost, especially where electrical service needs upgrading. Get a site-specific quote.
Energy and Maintenance
Ongoing costs cover electricity, filters, coil cleaning, drain maintenance, pump service, sensor calibration, refrigeration service, and rotor and reactivation maintenance on desiccant units.
Electricity is usually the biggest line. The formula:
(Watts ÷ 1,000) × hours of operation × rate per kWh = operating cost
Illustrative example, not an engineered calculation: A 700-watt unit running 12 hours a day at $0.15/kWh costs (700 ÷ 1,000) × 12 × 0.15 = $1.26 daily, roughly $38 a month. Swap in your actual wattage, runtime, and local rate. A unit cycling in a controlled space draws far less than one running flat out during active drying.
Total Cost of Ownership
Purchase price is a poor comparison basis for equipment that runs for years. Compare purchase and installation, energy at expected conditions, maintenance and consumables, service life and duty rating, downtime exposure, parts availability, and the material losses you avoid.
A cheap unit with poor efficiency and no parts support usually costs more over five years. That said, avoided losses depend entirely on your facility's exposure. No return on investment is guaranteed.
Industrial Dehumidifier Maintenance Tips
Continuous-duty equipment fails from neglected basics far more often than component defects. A short routine keeps performance near spec.
-
Clean or replace filters on schedule, more often in dusty or construction environments. A loaded filter chokes airflow, which cuts removal and strains the fan.
-
Inspect coils and airflow paths for dust, debris, and bent fins. Fouled coils kill heat transfer.
-
Check desiccant rotors and reactivation paths where applicable, seals, drive belts, and exhaust ducting.
-
Check drains and condensate pumps. Clear the strainer, confirm the pump cycles, and look for traps and kinks.
-
Keep airflow unobstructed. Inventory and pallets migrate. Recheck clearances.
-
Track RH, temperature, and runtime. A unit running longer to hold the same setpoint is warning you before it fails.
-
Follow the manufacturer's schedule and keep records, especially where humidity is a documented process parameter.
Why Choose AlorAir Industrial and Commercial Dehumidifiers
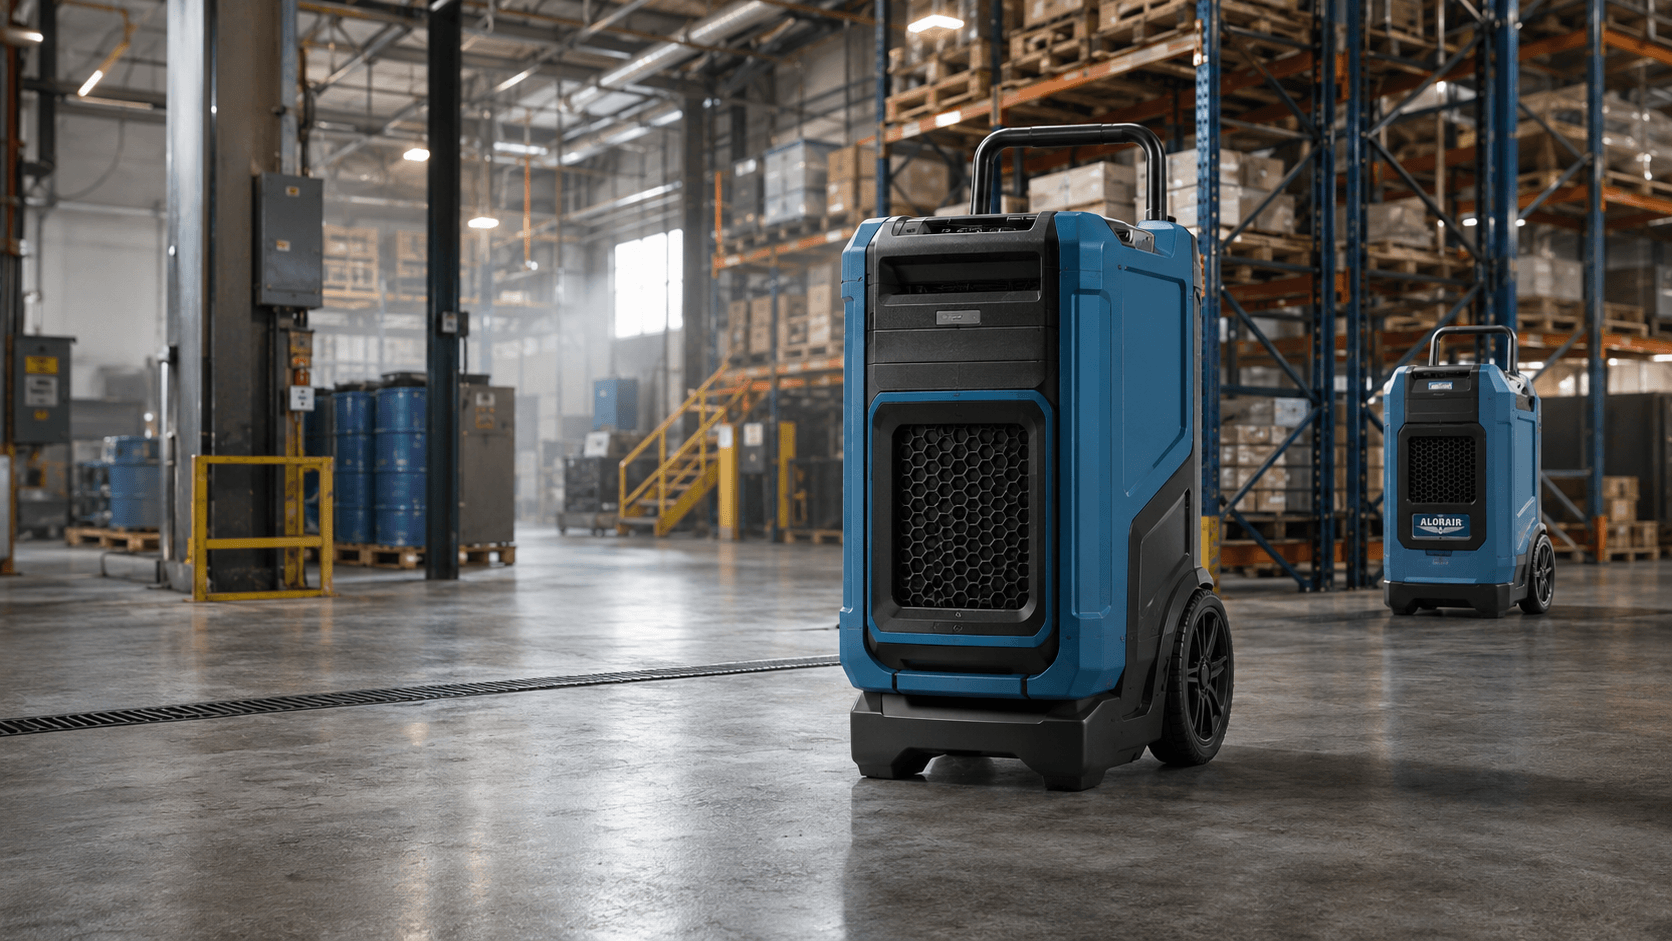
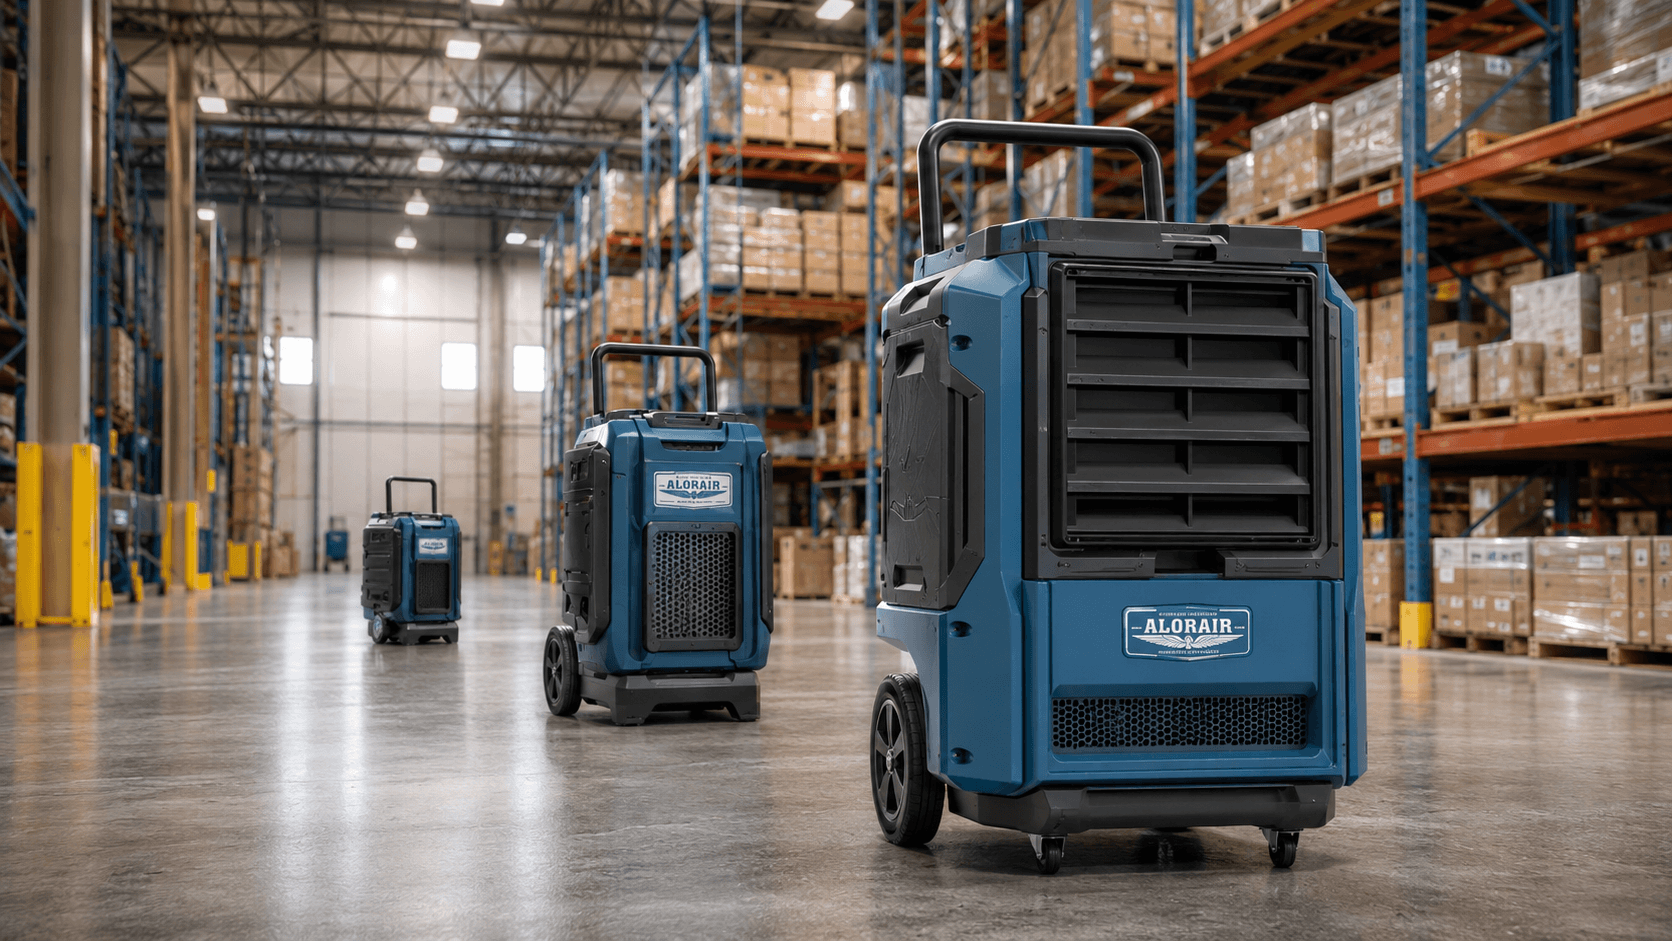
AlorAir builds high-capacity portable refrigerant dehumidifiers for restoration, construction drying, warehouses, crawl spaces, and workshops- jobs where equipment gets moved, stacked, and run hard.
-
Performance across the drying curve. AlorAir's SLGR models hold removal rates as air dries out, which is exactly where standard refrigerant units quit. Capacity across the Storm and Sentinel lines runs roughly 70 PPD to 220 PPD.
-
Certifications. ETL listed through Intertek. ENERGY STAR Most Efficient models, with roughly 20% lower energy use than non-certified equivalents. Amazon Climate Pledge Friendly certification.
-
Six-year limited warranty and US support. First two years full coverage. Units ship from US inventory, not overseas backorder. Phone and email support Monday through Friday, PST. Repair parts and filters stocked as separate SKUs, which is what determines whether a five-year-old unit gets fixed or replaced.
-
Site-ready design. Most units include integrated condensate pumps and drain hoses, so the gravity-drainage constraint disappears on sites with no low drain. WiFi models allow remote monitoring of RH, temperature and runtime. Housings stack and move.
-
Fleet pricing. Four-unit wholesale packs across Storm LGR Extreme, Storm Pro, Storm Ultra, Storm Elite and LGR 1250. Volume discounts: 10% over $3,000, 15% over $5,000, 18% over $10,000. Combo packs pair dehumidifiers with air movers and HEPA air scrubbers. Free shipping and financing available.
Conclusion
Two technologies, two jobs. Refrigerant units condense moisture on a cold coil and suit warm spaces with moderate targets, with LGR and SLGR extending that range into drier air. Desiccant units adsorb moisture onto a rotor and handle cold rooms and low dew points refrigerant can't practically reach.
Everything else follows from your moisture load, operating temperature, target humidity, airflow, and installation constraints. Compare units at your actual conditions, not headline saturation ratings. For low-dew-point or process-critical work, bring in a mechanical engineer before you commit.
Still deciding? Send us your space dimensions, operating temperature, target humidity and moisture source. Our team will recommend equipment matched to your conditions, no guesswork, no oversizing.
FAQs - Industrial Dehumidifier Guide
What's the difference between a commercial and an industrial dehumidifier?
There's no fixed line between them; suppliers use the labels inconsistently. Industrial units generally carry higher capacity, continuous-duty ratings and serviceable parts, so compare specs rather than categories.
Why does my dehumidifier remove less water than its rating?
Ratings come from saturation test conditions, often 80°F and 60% RH or higher. Removal drops as air gets cooler and drier, so check the manufacturer's performance curve for output at your actual conditions.
Refrigerant or desiccant, which one do I need?
Refrigerant suits warm spaces with moderate humidity targets and costs less to run. Desiccant is the requirement below roughly 50°F or where you need a genuinely low dew point.
Will a dehumidifier get rid of mold?
No. It lowers the humidity that supports growth, but existing mold needs physical remediation and any active leak has to be repaired first.
How many pints per day do I need?
It depends on air volume, envelope tightness, moisture source and target RH, not square footage alone. Use the capacity table above to narrow options, then run a proper load calculation.
What Size Industrial Dehumidifier Do I Need? Sizing Guide
Two buildings with the same square footage can have completely different moisture problems, and a unit sized for one may fail in the other. The right industrial size dehumidifier depends on how much water enters the air each day and how fast you need it gone. This guide shows you how to figure that out. That daily water total is the moisture load. It comes from outdoor humidity, air leakage, activities inside the space, and any water trapped in wet materials. Below, you'll see what drives industrial dehumidifier sizing, how to read capacity ratings without getting fooled, how to estimate your load, and the mistakes that leave people with equipment that runs all day and never catches up.
Why Square Footage Alone Is Not Enough?
Square footage skips the one thing that matters most: how much water is in the air. Floor area says nothing about how humid a space is, how much outside air gets in, or what's happening inside. Size on square footage alone and you usually end up with a unit that runs nonstop and never hits your target.
Ceiling Height and Air Volume
A 10,000-square-foot warehouse with a 30-foot ceiling holds far more air than the same floor at 12 feet. A dehumidifier treats a volume of air, not a floor. The taller building needs more capacity to reach and hold the same relative humidity (RH), how much moisture the air holds compared with the most it could hold at that temperature.
Starting and Target Humidity
The gap you're closing matters too. Dropping a space from 80% RH to 45% pulls out far more water than going from 55% to 45%. Your starting point and your goal decide how much moisture actually has to leave. Two identical rooms at different humidity levels are two different jobs.
Air Exchange and Internal Sources
Open dock doors, mechanical ventilation, and a leaky building all pull in humid outside air all day. Add people, wet materials, washdowns, or open water, and the load climbs no matter the floor size. This is why industrial work sizes by load, not by a square-footage chart.
What is Industrial Dehumidifier Capacity?
Capacity tells you how much water a unit removes in a day, but the number only means something once you know the test behind it. The same machine can carry two or three different ratings depending on the temperature and humidity used.
Comparing units without checking those conditions is one of the most common sizing mistakes.
Pints per Day and Test Conditions
Industrial dehumidifier capacity is usually given in pints per day (PPD, the water a unit pulls from the air over 24 hours. More PPD means more moisture removed, but only at the temperature and humidity where the number was measured.
Federal rules set those conditions. Under the U.S. Department of Energy test procedure (10 CFR Part 430, Appendix X1, which uses ANSI/AHAM DH-1-2022), portable units are rated at 65°F and 60% RH, and whole-home units at 73°F and 60% RH.
Older spec sheets often list a legacy figure taken at 80°F and 60% RH, which gives the same machine a bigger pint number.
Warmer, wetter air holds more moisture, so a unit tested at 80°F always posts a higher PPD than the same unit at 65°F. Compare capacity only when the conditions match. A "90-pint" unit at 80°F is not the same as a "90-pint" unit at 65°F.
Converting Between PPD, L/Day, and kg/h
Many industrial specs, especially from overseas makers, list capacity in liters per day (L/day) or kilograms per hour (kg/h). Convert everything to one basis before you compare.
|
From |
To |
Multiply by |
Example |
|
Pints/day |
Liters/day |
0.4732 |
100 PPD ≈ 47.3 L/day |
|
Liters/day |
Pints/day |
2.113 |
50 L/day ≈ 105.7 PPD |
|
Liters/day |
kg/h |
÷ 24 |
48 L/day ≈ 2.0 kg/h |
|
kg/h |
Liters/day |
x 24 |
3 kg/h ≈ 72 L/day |
These assume water near room temperature, where a liter weighs about a kilogram. Convert first, then confirm every figure was measured at the same conditions.
Rated Capacity vs. Real-World Performance
Published capacity is a lab benchmark, not a field promise. Real output depends on the temperature and humidity in your space, and both usually differ from the test. In a cool or moderately humid room, actual extraction often falls well under the rated PPD.
Some makers also publish a saturation capacity, measured at roughly 95°F and 90% RH. That's a hot, near-tropical environment few industrial spaces ever see, so it flatters the number. Size to a saturation rating and your unit will come up short the moment conditions return to normal.
The safe rule: size against the rating closest to your real conditions, then add margin. A unit that hits its target easily at design conditions can handle spikes. One sized to its best-case number struggles the minute the air turns cooler or drier.
Factors That Determine Required Capacity
Required capacity is the sum of every moisture source the unit must handle, plus how fast you need results. Four groups drive that total. Work through each and a vague "how big?" becomes a number you can defend.
Space Volume and Humidity Conditions
Start with volume. Multiply length by width by average ceiling height for cubic footage, since the unit treats the whole air volume. High-bay warehouses hold far more air than their footprint hints.
Then set three points: current temperature and RH, the RH you want to hold, and the gap between them.
A room at 75% RH heading for 45% is a much bigger job than one already at 55%. Temperature counts too, because colder air holds less moisture and changes how much a unit can pull.
Outdoor Air and Building Infiltration
Every cubic foot of outside air brings its own moisture, and in humid climates that can outweigh everything inside. Ventilation, exhaust systems drawing makeup air, and plain envelope leakage add moisture around the clock.
Frequently opened doors are a big, overlooked source. Dock bays left open during shifts let in large volumes of humid air, and each opening undoes progress. In a leaky building or a wet climate, outdoor air can set your equipment size more than anything indoors.
Internal Moisture Sources
What happens inside adds straight to the load. People are steady sources; the ASHRAE Handbook puts a seated adult at roughly a quarter-pint of moisture per hour, and active workers give off more. Across a full shift, that adds up.
Processes usually add far more. Washdowns, steam, wet or curing materials, coating and printing lines, and open water all release moisture continuously. Cleaning creates sharp spikes.
List each source honestly, because one steam-heavy process can outweigh a building's entire outdoor load.
Operating and Drying Time
Your deadline changes everything. Holding humidity in an already-dry space only needs enough capacity to offset incoming moisture. Drying a wet space by a set date is a different job; you're removing a large stored volume of water inside a fixed window.
Tighter windows need bigger equipment. Pulling 200 pints of stored water over ten days is easy; doing it in two takes several times the capacity. Keep the maintenance question and the drying question separate, because sizing for one won't cover the other.
How to Estimate the Required Capacity
The process for an industrial dehumidifier load calculation is simple: gather your data, total the load, then match it to equipment rated at your real conditions. If you want the fuller version alongside equipment options, our complete guide to industrial dehumidification walks through it in detail.
Gather the Project Information
Get your inputs first. You need space dimensions and average ceiling height, current temperature and RH, target RH, the ventilation and door-opening pattern, a list of internal moisture sources, and your drying deadline if the space is wet.
Measure, don't guess. A thermo-hygrometer read at a few points during normal operation beats assumptions every time.
Estimate the Total Moisture Load
Add the sources together instead of sizing to one. The total combines outdoor moisture from ventilation and leakage, internal moisture from people and processes, and, for drying jobs, water stored in wet materials.
Estimate each stream, then sum them into a daily total in pints or liters per day. Latent-load methods like ACCA Manual J or the ASHRAE Handbook exist to do this properly, and complex facilities are worth that effort. The output is one number: total moisture to remove per day at your conditions.
Match the Load to Equipment Capacity
Compare your load against manufacturer data at the conditions closest to your space, not the headline rating. If your room sits at 60°F, an 80°F saturation figure is useless; you need output near 60°F. Good performance data lists capacity across a range of temperatures for exactly this.
Add margin above your estimate for measurement error, spikes, and future changes. Size so the unit meets the target comfortably at design conditions, not exactly at its best-case number, and the space stays stable when things shift.
Simplified Sizing Example
Say a 20,000-cubic-foot storage room sits at 70% RH and needs to hold 50%, with moderate door traffic and no major internal sources. Combining an initial pull-down with ongoing infiltration might land near an assumed 120 pints per day at the room's temperature.
You'd then pick a unit whose output at that temperature clears 120 PPD, not one whose 80°F saturation figure reads 120. With margin, that might point to a unit rated around 150 PPD at design conditions.
Typical Capacity Ranges by Industrial Application
These are starting points, not a substitute for a load calculation. Your real numbers depend on climate, air exchange, and processes.
Warehouse and General Storage
Warehouses mostly fight outdoor air and dock-door exchange, not internal moisture. Tall ceilings mean capacity scales with volume, so large sites often need several units or a ducted system.
Dry-goods storage needs less than a space guarding corrosion-sensitive metal or electronics, which targets lower humidity and pushes size up.
Production and Packaging Rooms
These rooms carry heavier loads because the work itself adds moisture. Washdowns, steam, coating lines, and wet materials can make internal sources the main driver, so they often need more capacity per cubic foot than storage of the same size. Tight RH targets for product quality push it higher still.
Cold Storage and Loading Transition Zones
Cold spaces are their own case. Refrigerant units lose efficiency as temperatures fall and can frost over near freezing. Transition zones where cold and warm air meet- chilled doorways, loading vestibules, freezer anterooms- see heavy condensation and usually need desiccant equipment sized to the low-temperature load.
Choosing the Right Equipment
Once you know the load, the technology and airflow decide if the equipment actually delivers it. Capacity alone doesn't. Explore suitable units in this range of commercial and industrial dehumidifiers here, once you have your target numbers.
Refrigerant vs. Desiccant Dehumidifiers
Refrigerant units remove moisture by cooling air below its dew point on a cold coil. They suit warm, humid spaces like most warehouses and production rooms, but output drops in cooler, drier air and struggles below about 60°F.
Desiccant units absorb moisture with a chemical medium, so they hold up in the cold and reach very low dew points. For cold storage, freezer transitions, or low-humidity targets, desiccant is usually the better call despite higher energy use.
Airflow, Ducting and Drainage
Airflow, measured in CFM (cubic feet per minute), decides if treated air reaches the whole space. A unit with plenty of PPD but poor distribution dries the air around itself while far corners stay damp, so match airflow and ducting to the room.
Duct resistance eats into delivered airflow and effective capacity, so plan for long or tight runs. And set up continuous drainage; gravity or pumped drain lines let a high-volume unit run unattended instead of filling a reservoir.
Common Sizing Mistakes
A handful of errors cause most bad installs:
● Sizing by square footage alone. Skips ceiling height, humidity, and moisture sources, so the unit never catches up.
● Comparing ratings at different conditions. An 80°F PPD isn't an equal 65°F PPD; mixing them wrecks the comparison.
● Overlooking moisture sources. Leaving out infiltration, people, or washdowns understates the real load.
● Sizing to saturation capacity. The best-case 95°F/90% RH number leaves you undersized in normal air.
● Neglecting airflow and drainage. Plenty of capacity still fails with poor distribution or an undersized drain.
Conclusion
Sizing an industrial dehumidifier comes down to one idea: match capacity to moisture load, not floor area. Measure your volume and humidity, account for outside air and internal sources, decide if you're holding a space dry or drying a wet one, then match that load to equipment rated at your real conditions with margin on top. An undersized unit runs forever and never wins; an oversized one wastes money and cycles hard. Rather skip the guesswork, browse our range of commercial and industrial dehumidifiers at thedryair.com built for warehouses, production floors, and cold storage.
Send us your numbers and get a project-specific dehumidifier recommendation- no guesswork, just the right-sized unit for your space.
FAQs - What Size Industrial Dehumidifier Do I Need?
What size industrial dehumidifier do I need?
It depends on your total moisture load, not square footage. Estimate the daily moisture from outdoor infiltration, internal sources, and any wet materials, then choose a unit whose rated capacity at your operating temperature comfortably exceeds that load with margin added.
Refrigerant or desiccant for a cold space?
Desiccant. Refrigerant units lose efficiency below about 60°F and can frost over near freezing. For cold storage, freezer transition zones, or very low humidity targets, desiccant equipment holds performance where refrigerant models cannot.
How does a drying deadline change the size I need?
Tighter deadlines require larger equipment. Maintaining humidity only needs enough capacity to offset incoming moisture, but removing a fixed volume of stored water within a few days can demand several times that capacity.
How to size an industrial dehumidifier?
Size it by moisture load, not floor area. Gather your inputs, space volume, current and target RH, ventilation and door traffic, internal moisture sources, and any drying deadline. Add those into a daily moisture total, then match it to a unit's capacity at your real operating conditions (not the saturation rating), with margin added. For cold spaces, tight targets, or large facilities, a professional load calculation is worth it.
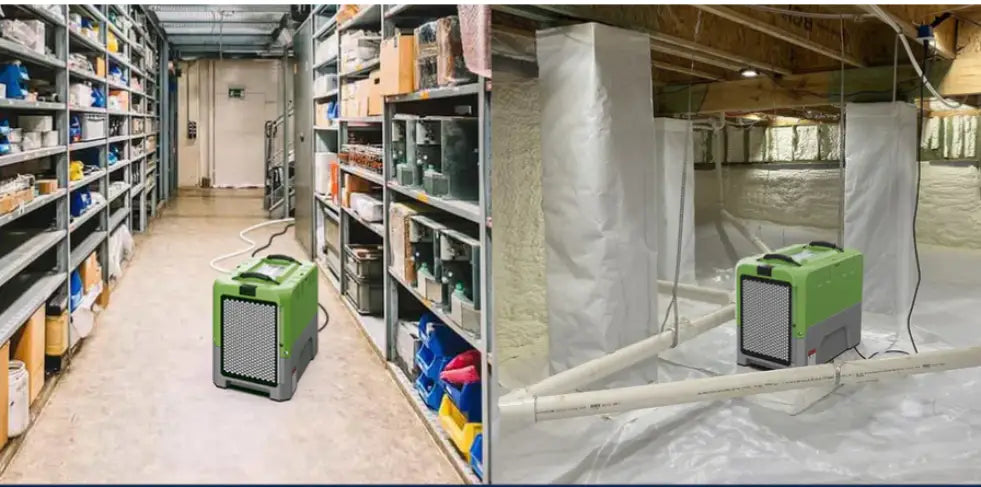
10 Best Crawl Space Dehumidifiers of 2025
If your floors feel soft, insulation smells musty, or a hygrometer shows >60% RH under the house, it’s time for a crawl space dehumidifier.
This 2025 guide ranks the best dehumidifier for crawlspace use, including crawl space deh
-
Best dehumidifiers for crawl space are compact, metal-housed, low-temp units with a true humidistat, continuous drainage, and auto-defrost.
-
Want remote alerts? Choose a crawl space dehumidifier with Wi-Fi—perfect for second homes or rentals.
-
Size by PPD @ AHAM/DOE, not marketing “max” ratings. For 800–2,000 sq ft crawls, that usually means 70–120 PPD; coastal/wet sites may need 145–200 PPD.
The 5-Minute Selection Framework (ACE-DD)
-
Area (sq. ft.) + approximate height ⇒ volume (cu. ft.).
-
Climate & load: coastal, high groundwater, or frequent plumbing leaks = “wet.”
-
Exhaust/drain: gravity to a floor drain or pump if you must lift condensate.
-
Defrost: must have automatic hot-gas defrost for ~55–65°F crawl temps.
-
Data/Control: do you want Wi-Fi/app alerts, or a simple wall humidistat?
1. Compact 70-PPD Class (Tight Spaces, Mild–Moderate Moisture)

Ideal for low crawl spaces with moderate moisture; small footprint fits tight areas.
Advantages:
-
Fits low-clearance crawl spaces
-
Handles 800–1,200 sq. ft at AHAM rating
-
Quiet operation (~49–52 dBA)
-
Auto-defrost and washable pre-filter
Disadvantages:
-
No built-in pump (gravity drain required)
-
Limited to moderate moisture levels
What We Like: Efficient and quiet; easy placement in tight areas.
What We Don’t Like: Requires nearby drain for continuous operation.
Specs:
-
Capacity: 70 PPD @ AHAM
-
Noise: 49–52 dBA
-
Dimensions: Compact for low crawl spaces
2. 70-PPD With Built-In Pump (Low Crawl + Long Drain Path)

Includes a built-in pump for long vertical drainage—no floor drain needed.
Advantages:
-
Internal pump for easy drainage
-
Continuous operation without manual emptying
-
Fits tight crawl spaces
Disadvantages:
-
Slightly higher cost than gravity-only units
-
Pump may require maintenance over time
What We Like: Ideal for homes without floor drains; very low-maintenance.
What We Don’t Like: Initial cost higher than non-pump units.
Specs:
-
Capacity: 70 PPD @ AHAM
-
Pump height: Up to 10–15 ft vertical
-
Noise: ~50 dBA
3. Energy-Savvy 70–80 PPD (Mild Loads, Year-Round Running)

Energy-efficient unit optimized for year-round operation in mild humid climates.
Advantages:
-
DOE-tested, energy-efficient
-
Can run 24/7 at ~45–50% RH
-
Low operating costs
Disadvantages:
-
Not suited for extreme wet conditions
-
Smaller footprint limits coverage for large homes
What We Like: Saves electricity for long-term maintenance
What We Don’t Like: Limited moisture removal capacity for wetter environments
Specs:
-
Capacity: 70–80 PPD @ AHAM
-
Energy Star rating
-
Continuous operation capable
4. 90–100 PPD Return-Duct Ready (Even Distribution)
Mid-capacity unit with duct collars for balanced air circulation in longer crawls.
Advantages:
-
Supports return/duct air for even drying
-
Covers 1,200–1,800 sq. ft crawl spaces
-
Higher airflow than small units
Disadvantages:
-
Larger footprint may be tricky in very low spaces
-
Moderate noise levels
What We Like: Balanced moisture removal for long or segmented crawls
What We Don’t Like: Requires some ducting setup for best results
Specs:
-
Capacity: 90–100 PPD @ AHAM
-
Duct-ready
-
Noise: ~52–55 dBA
5. 110–120 PPD With Pump (Coastal / Wet Sites)
Powerful pump-equipped unit for coastal or consistently wet areas.
Advantages:
-
20–30% more drying power than 90-class units
-
Pump handles elevated drain paths
-
Effective during rainy periods or shoulder seasons
Disadvantages:
-
Larger and heavier
-
More expensive upfront
What We Like: Reliable in humid/wet climates; prevents mold and cupping floors
What We Don’t Like: Not compact; may be overkill for smaller homes
Specs:
-
Capacity: 110–120 PPD @ AHAM
-
Pump: built-in
-
Noise: Moderate
6. Low-Noise 120-PPD Metal Body (Live-Over Rooms Above)
Metal housing and vibration control make it ideal for spaces above living areas.
Advantages:
-
Quiet operation with vibration reduction
-
Durable, corrosion-resistant metal body
-
High capacity for moderate to large crawl spaces
Disadvantages:
-
Slightly heavier, harder to move
-
Higher price than plastic-bodied units
What We Like: Great for living-over spaces; long-lasting and serviceable parts
What We Don’t Like: Can be overkill for small or mild-moisture crawl spaces
Specs:
-
Capacity: 120 PPD @ AHAM
-
Noise: Low (~50–53 dBA)
-
Housing: Metal, corrosion-resistant
7. 145–160 PPD High-Capacity (Large Footprints)
Simple Description: Designed for large crawls or taller spaces; quickly recovers after rain or leaks.
Advantages:
-
Covers 1,800–2,300 sq. ft
-
Rapid moisture removal for high-humidity environments
-
Heavy-duty design for frequent use
Disadvantages:
-
Large footprint
-
Louder operation due to high airflow
What We Like: Excellent for larger homes; strong drying power for wet conditions
What We Don’t Like: Takes more space; not ideal for very tight crawl areas
Specs:
-
Capacity: 145–160 PPD @ AHAM
-
Noise: Moderate-high
-
Dimensions: Larger footprint
8. 180–200 PPD Heavy-Duty (Very Wet / Fast Pull-Down)
Extreme-capacity unit for post-flood, remediation, or very wet crawl spaces.
Advantages:
-
Highest drying power for fast pull-down
-
Hot-gas defrost, pump, and industrial controls
-
Can handle extreme humidity spikes
Disadvantages:
-
Expensive
-
Requires significant space and power
What We Like: Future-proof for flood-prone or highly humid homes
What We Don’t Like: Overkill for average crawl spaces; loud operation
Specs:
-
Capacity: 180–200 PPD @ AHAM
-
Pump: Built-in, high vertical reach
-
Defrost: Hot-gas
9. Wi-Fi 70–120 PPD (App + Alerts)
Smart crawl space dehumidifier with app control and remote alerts.
Advantages:
-
Monitor RH and receive alerts remotely
-
Fine-tune settings from your phone
-
Capacity ranges to match various crawl sizes
Disadvantages:
-
Slightly more expensive due to smart features
-
Wi-Fi required for full functionality
What We Like: Great for landlords, snowbirds, or second homes
What We Don’t Like: Smart features add complexity; overkill for simple setups
Specs:
-
Capacity: 70–120 PPD @ AHAM
-
Connectivity: Wi-Fi
-
Alerts: Full-tank and maintenance notifications
10. Ductable “Whole-Home + Crawl” Hybrid
Unit can dry crawl space and inject dry air into the living area.
Advantages:
-
Dual-purpose: crawl + living area
-
Ductable for broader air distribution
-
Efficient for modern, tight homes
Disadvantages:
-
Requires duct installation
-
More complex setup and higher cost
What We Like: Ideal for homes where crawl moisture impacts indoor air quality
What We Don’t Like: Not plug-and-play; needs planning for ducts
Specs:
-
Capacity: Varies, typically 90–160 PPD
-
Ductable: Yes
-
Control: Manual or smart controller
10 crawl space dehumidifiers for quick comparison
|
# |
Model / Class |
Capacity (PPD @ AHAM) |
Key Feature |
Noise Level |
Best For |
Pump |
Notes |
|
1 |
Compact 70-PPD Class |
70 |
Tight crawl spaces |
49–52 dBA |
Small crawl, mild moisture |
No |
Gravity drain required |
|
2 |
70-PPD With Built-In Pump |
70 |
Built-in pump, long vertical drain |
~50 dBA |
Crawl without floor drain |
Yes |
Continuous operation |
|
3 |
Energy-Savvy 70–80 PPD |
70–80 |
Energy-efficient, year-round use |
Low |
Mild climates, long-term |
No |
Energy Star-rated |
|
4 |
90–100 PPD Return-Duct Ready |
90–100 |
Duct-ready for balanced air |
52–55 dBA |
Long / segmented crawls |
No |
Mid-capacity, duct setup needed |
|
5 |
110–120 PPD With Pump |
110–120 |
Pump handles elevated drain |
Moderate |
Coastal / wet areas |
Yes |
Heavy-duty, reliable |
|
6 |
Low-Noise 120-PPD Metal Body |
120 |
Metal housing, vibration control |
50–53 dBA |
Live-over rooms |
No |
Quiet, durable |
|
7 |
145–160 PPD High-Capacity |
145–160 |
High airflow, large coverage |
Moderate-high |
Large homes / tall crawl |
No |
Rapid moisture removal |
|
8 |
180–200 PPD Heavy-Duty |
180–200 |
Hot-gas defrost, industrial controls |
High |
Flood-prone / extreme humidity |
Yes |
Extreme capacity |
|
9 |
Wi-Fi 70–120 PPD |
70–120 |
Smart app + alerts |
Low-Moderate |
Second homes / rentals |
Optional |
Remote monitoring |
|
10 |
Ductable Whole-Home + Crawl |
90–160 |
Dual-purpose ductable |
Varies |
Crawl + living area |
Optional |
Requires duct installation |
Feature Deep-Dive (what actually matters)
- Capacity at realistic conditions: Compare PPD @ AHAM/DOE (around 60% RH, 80–65°F) rather than “saturation” (100% RH). AHAM/DOE ratings tell you what the unit does in real crawl temps.
- Low-temperature performance: Auto defrost is non-negotiable; crawls run ~55–65°F much of the year.
- Drainage: Gravity to a floor drain is simplest; pump if you must lift or run long distances. Use ¾″ vinyl/PVC and avoid sags; if you’re above living space, add a secondary pan and float switch.
- Controls: Built-in humidistat is fine; a remote wall sensor can read more accurately. Wi-Fi/app helps with alerts and data, especially when you can’t check often.
- Build quality: Prefer metal housing and corrosion-resistant components for longevity; look at filter access and service clearance.
- Ducting: Collars allow pull-and-push for even RH; insulate ducts if they run through cold/ hot zones.
Sizing Your Crawl Space Dehumidifier (simple math)
-
Measure: length × width × average height = volume (cu. ft.).
-
Moisture load: If you’ve seen standing water, efflorescence, soggy insulation, or relative humidity >70% often, treat it as wet.
-
Pick a class:
-
- Up to ~1,000 sq. ft (mild): 70 PPD class.
- 1,000–1,600 sq. ft or wetter: 90–120 PPD class.
- 1,600–2,300 sq. ft or very wet: 145–200 PPD class.
-
-
Round up if you’re coastal, have long ducts, or want faster pull-down.
-
-
Setpoint: start at 45–50% RH; tweak seasonally.
Installation At-a-Glance (keep it simple, keep it dry)
- Placement: near the center of the crawl if possible; keep filters accessible.
- Air path: avoid blowing directly into insulation; if ducted, distribute to distant bays.
- Drain: shortest path, continuous slope (≈1/8″ per foot) or a pump.
- Power: dedicated receptacle; keep cords off the ground and protected.
- Seal & line: a quality vapor barrier with taped seams reduces the dehumidifier’s workload and electric cost.
Maintenance (so it keeps working for years)
- Clean/replace filters per schedule; vacuum the intake grill.
- Flush drain line each season; check pump discharge.
- Verify RH with a hygrometer a few times a year; confirm you’re at 45–55% RH.
- Inspect liner & seams; fix tears to keep the load down.
Why Wi-Fi Might Be Worth It
A crawl space dehumidifier with Wi-Fi gives you a humidity dashboard, runtime data, and alerts if RH drifts or the unit needs attention. That’s peace of mind for absentee owners and an easy way to diagnose if a change (heavy rain, plumbing drip) is pushing RH higher. If you manage multiple properties, Wi-Fi is a time saver.
Editor’s Shortlist (pair by need)
- Small/tight crawl, mild dampness → Compact 70-PPD; gravity drain; optional Wi-Fi.
- Small crawl, long drain run → 70-PPD with internal pump.
- Mid-size, mixed pockets → 90–100 PPD with duct collars for better distribution.
- Coastal/wet → 110–120 PPD with pump and strong hot-gas defrost.
- Large or very wet → 145–200 PPD with pump; consider ducting for even RH.
- Remote monitoring → Any of the above with Wi-Fi/app control.
When you’re ready to compare pro-grade builds and pump options, check TheDryAir’s Water-Damage Restoration Dehumidifiers collection—good for robust chassis, pumps, and field-serviceable parts that stand up to tough crawl spaces.
Frequently Asked Questions
What is the best dehumidifier in 2025 for crawl spaces?
The “best” depends on size and moisture load, but top performers share the same traits: 70–200 PPD @ AHAM/DOE, auto-defrost, continuous drainage (pump or gravity), humidistat control, and serviceable filters. For most homes, 90–120 PPD with pump is the sweet spot.
What is the best brand of crawl space dehumidifier?
Look for brands known for metal housings, reliable pumps, hot-gas defrost, and strong support. Check user feedback for noise, reliability, and customer service. In practice, pick the feature set first (capacity, pump, Wi-Fi), then choose the brand that meets those needs and offers parts availability.
How to choose a dehumidifier for a crawl space?
Measure square footage/height, assess moisture load, then match capacity (PPD @ AHAM). Decide gravity vs. pump, choose auto-defrost for cool temps, and consider Wi-Fi for remote checks. If you have long crawl runs, pick a ductable model for even distribution.
Do I need Wi-Fi?
Not mandatory, but helpful for alerts and trend monitoring, especially for second homes or rentals. It can prevent surprises by flagging unusual RH rises.
What RH should my crawl space be?
Maintain ~45–55% RH (never let it sit above 60%). That range keeps mold at bay and protects wood and insulation.
How This Compares with Consumer Roundups
Consumer guides tend to highlight capacity, defrost, drain method, and footprint—plus a mix of budget and pro units—which aligns with this checklist. They also stress sizing to area + moisture and verify that auto-defrost is essential in cooler spaces. That’s the heart of crawl-space success.
Bottom Line
Finding the best crawl space dehumidifiers in 2025 comes down to the basics: size to the load, insist on auto-defrost, plan reliable drainage, and consider Wi-Fi if you won’t check the space often. For most homes between 1,000 and 2,000 sq. ft, a 90–120 PPD class unit with a pump and humidistat set to 45–50% RH will deliver dry, stable conditions with minimal babysitting. If your site is larger or wetter, step up to 145–200 PPD and consider ducting for even results.
Ready to compare durable options? Explore the pro-grade lineup in Water-Damage Restoration Dehumidifiers—then match capacity, pump, and smart control to your crawl.

The Hidden Link Between Humidity and Histamines
For millions of allergy sufferers, the battle usually involves antihistamines, nasal sprays, and high-end air purifiers. However, in 2026, air quality experts are focusing on a "hidden" trigger that medicine can't always fix: Relative Humidity (RH). If you find yourself sneezing more in the basement or waking up with a stuffy nose during a rainy week, the culprit isn't just "dust"—it’s the moisture in the air.
So, does a dehumidifier help with allergies? The short answer is yes, but not by "filtering" the air. Instead, a dehumidifier acts as a biological interceptor, changing the environment so that common allergens can no longer survive or reproduce. This guide explores the science of humidity control and how it serves as a foundational pillar for allergy and asthma management.
How Dehumidifiers "Starve" Your Allergy Triggers

Allergens like mold and dust mites aren't just floating around; they are actively seeking moisture to thrive. When you run a dehumidifier, you are essentially "starving" these triggers.
The Biological "Kill Zone"
Most common indoor allergens require a specific humidity threshold to remain active. By maintaining your home between 45% and 50% RH, you create a desert-like environment for microscopic pests.
- Dust Mites: These microscopic creatures don't drink water; they absorb it through their skin from the air. When RH drops below 50%, they desiccate (dry out) and die.
- Mold & Mildew: Mold spores are dormant until they hit a surface with a moisture content high enough to trigger growth. Dehumidifiers prevent the "dew point" from being reached on cold walls and windows.
Three Major Allergy Benefits of Humidity Control
Eliminating the Dust Mite Factory
Dust mites are the leading cause of year-round indoor allergies. Their waste particles (feces) and decaying body parts contain a protein that triggers asthma attacks and sneezing fits.
- The Impact: A dehumidifier lowers the population density of mites in your mattress, carpets, and upholstered furniture.
- 2026 Pro Tip: Use a dehumidifier in conjunction with "dust-mite proof" zippered covers for a 90% reduction in exposure.
Stopping Mold Spore Production
Mold doesn't just look bad; it releases reproductive "seeds" called spores into the air. When inhaled, these spores cause immediate inflammation of the respiratory tract.
- The Impact: By keeping the air dry, you stop the lifecycle of mold colonies in damp areas like bathrooms and laundry rooms.
Reducing "Musty" Odor Irritation
That "old basement" smell is actually Volatile Organic Compounds (VOCs) released by mold and bacteria. These gases can irritate sensitive lungs even if a full-blown allergy isn't present.
Recommended Humidity Levels for Allergy Relief
|
Humidity Level |
Effect on Allergens |
Health Impact |
|
Above 60% |
Extreme Growth |
High risk of mold; dust mite explosion. |
|
50% - 60% |
Active Growth |
Common triggers remain present. |
|
45% - 50% |
The Sweet Spot |
Mites die; mold stays dormant; lungs stay hydrated. |
|
Below 30% |
Too Dry |
Irritated sinuses; increased risk of viruses. |
Dehumidifier vs. Air Purifier: Which Do You Need?

In 2026, the "Dry Air" philosophy suggests that these two devices are partners, not competitors.
- The Air Purifier (The Sweeper): Its job is to catch the particles already in the air (pollen, dander, smoke).
- The Dehumidifier (The Prevention): Its job is to stop the source of the allergens (mold growth and mite reproduction).
- Expert Verdict: If you have a damp basement or high summer humidity, an air purifier alone will fail because the mold will grow faster than the filter can catch it. You need the dehumidifier to stop the growth at the source.
Identifying the "Damp Zones" in Your Home

Allergy triggers often hide in micro-climates where you least expect them.
- Crawl Spaces: Soil moisture migrates upward through floorboards, bringing "Stack Effect" air—and mold spores—into your bedroom.
- Window Sills: Condensation in the winter creates a perfect "petri dish" for black mold.
- Behind Furniture: Areas with poor airflow against exterior walls are prime spots for hidden mildew.
Sizing Your Dehumidifier for Respiratory Health
Choosing the wrong size can be counterproductive. A unit that is too small will run constantly without ever reaching the 50% "safe zone."
- Small Spaces (Bathrooms/Closets): 20–30 pint capacity. Look for "Midea Cube" style units for portability.
- Medium Spaces (Living Rooms/Basements): 50–70 pint capacity. Santa Fe or Honeywell models are 2026 favorites for durability.
- Whole-Home (Ducted): 80–120 pint capacity. AprilAire units integrate with your HVAC to protect every room.
The "Stack Effect": How Basement Air Reaches Your Lungs

Many people think that a dehumidifier in the basement only helps the basement. However, due to a physical phenomenon called the "Stack Effect," the air in your lower levels is constantly migrating upward into your living spaces.
- The Upward Draft: As warm air rises and escapes through your attic or upper-floor windows, it creates a vacuum that pulls air from the crawl space and basement.
- The Contaminant Highway: If your basement is damp (above 60% RH), this upward-moving air carries mold spores and dust mite waste directly into your bedroom.
- The Solution: By placing a high-capacity dehumidifier like a Santa Fe or AprilAire in your lowest level, you are effectively "cleaning" the source air for the entire house.
Dehumidifiers and Pet Allergies: A Surprising Link
While air purifiers are the go-to for pet hair, a dehumidifier plays a secret role in managing pet dander allergies.
- Dander Adhesion: In high humidity, pet dander (microscopic skin flakes) becomes "sticky" and heavy. It clings to carpets, curtains, and upholstery, making it much harder for a vacuum or air purifier to remove.
- The Drying Advantage: A dehumidifier helps keep dander "crisp" and lightweight. This allows your HEPA air purifier to more easily pull the particles out of the air and into the filter.
- Odor Control: High humidity amplifies the "wet dog" or "litter box" smell. Drier air keeps these organic odors neutralized, providing a fresher-smelling home for pet owners.
Long-Term Health: Preventing "New-Onset" Asthma
Perhaps the most significant reason to manage humidity in 2026 is the prevention of chronic conditions. Recent longitudinal studies have suggested that living in a damp environment doesn't just trigger existing allergies—it can actually cause new ones.
- Early Childhood Development: Children raised in homes with controlled humidity (45–50% RH) are statistically less likely to develop asthma or chronic allergic rhinitis.
- Secondary Infection Prevention: By keeping the nasal passages clear and the lungs free from mold-induced inflammation, your immune system is better equipped to fight off common 2026 winter viruses.
- The "Dry Air" Investment: A dehumidifier is a one-time purchase that pays dividends in reduced doctor visits and a higher quality of life for everyone in the household.
|
Condition |
Humidity Trigger |
Dehumidifier Benefit |
|
Chronic Sneezing |
Dust Mite Waste |
Desiccates and kills the mite population. |
|
Wheezing/Coughing |
Mold Spores |
Stops the germination of mold colonies. |
|
Sinus Pressure |
VOCs from Bacteria |
Neutralizes the "musty" microbial gases. |
|
Itchy Eyes |
Sticky Dander/Pollen |
Prevents allergens from bonding to furniture. |
Conclusion
So, does a dehumidifier help with allergies? Absolutely. By controlling the moisture in your air, you are fundamentally changing the biology of your home. You aren't just treating the symptoms with a pill; you are removing the cause of the inflammation.
When you pair a high-quality dehumidifier with regular HEPA vacuuming and air purification, you create a 2026 "clean air sanctuary" that allows your respiratory system to finally rest.
Frequently Asked Questions
Can a dehumidifier replace my allergy medication?
No. It is a supplemental tool. While it reduces the triggers, you should always follow your doctor’s prescribed treatment plan.
How long does it take to see an improvement in allergy symptoms?
Most users report a change in "air feel" within 24 hours, but it may take 1–2 weeks for dust mite populations to significantly decline.
Should I run my dehumidifier in the winter?
Usually no. Winter air is naturally dry. However, if you see condensation on your windows, you may need to run it at a low setting to prevent window-frame mold.
Will a dehumidifier help with hay fever (pollen)?
Only indirectly. By keeping you indoors with the windows closed to maintain humidity, you are exposed to less pollen. However, a HEPA air purifier is the better tool for active pollen removal.
Are "basement smells" actually dangerous?
That "musty" smell is a sign of active microbial growth. For sensitive individuals and those with asthma, chronic exposure to these odors can lead to increased lung inflammation.
Is it better to have a portable or a whole-house unit for allergies?
If your allergies are severe, a whole-house unit (like AprilAire) is best because it ensures the humidity is controlled in the bedroom, kitchen, and living room simultaneously.

Fast Local Delivery

100% Satisfaction Guaranteed

30-day FREE Return Policy
